How to Install a WordPress Theme: 4 Methods and Fixes
For a free theme, open Appearance > Themes > Add Theme, search, install and preview it before activating. For a premium theme, use Upload Theme with the installable ZIP. Back up an existing site first, and keep file-manager or SFTP access available in case you need to undo the change.
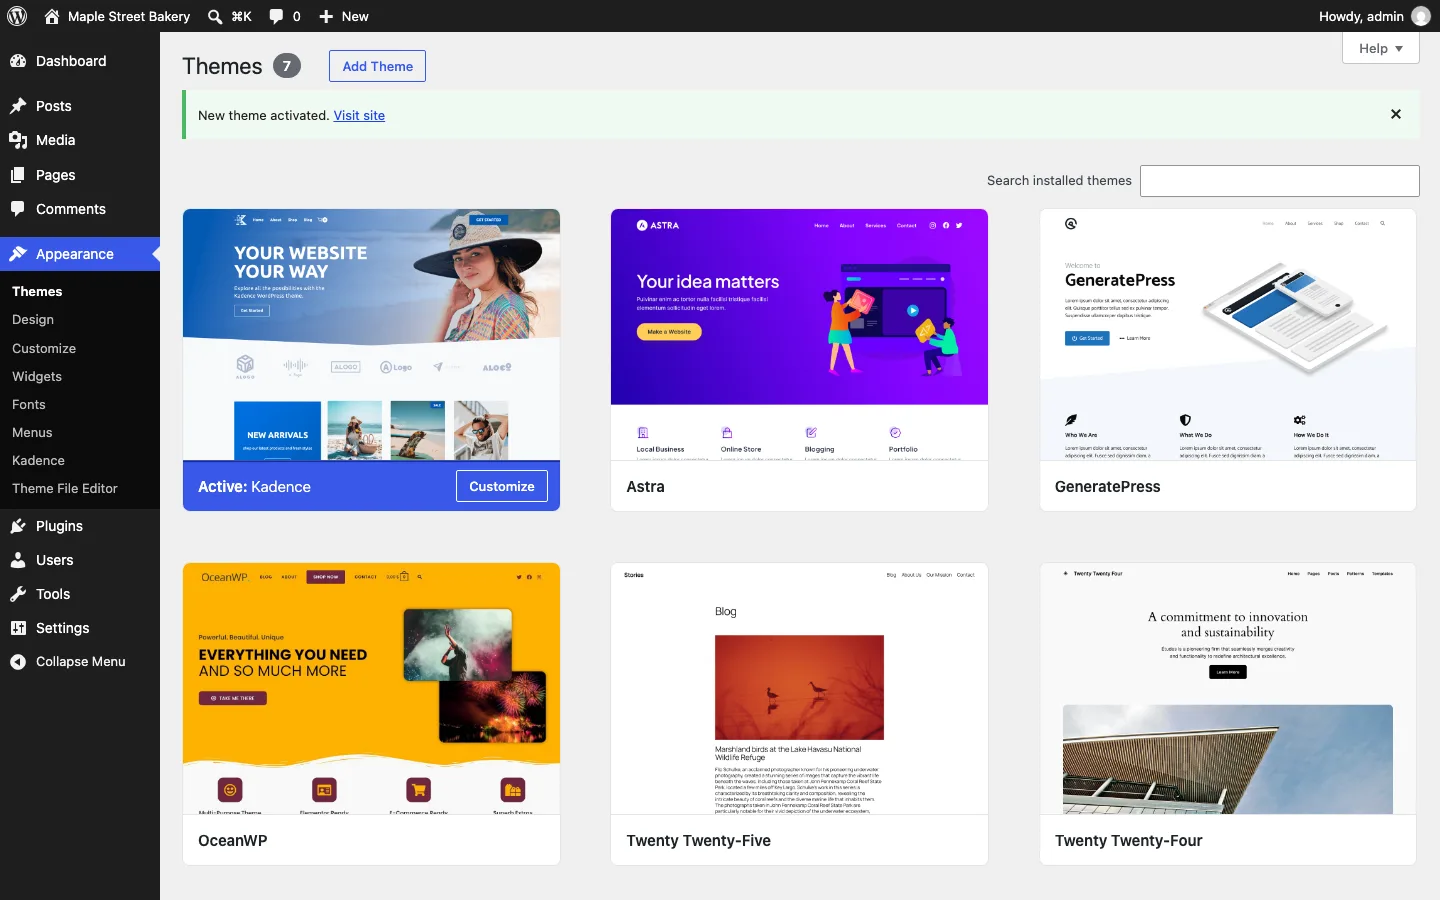
Before You Install a Theme
- Back up your site. Installing a theme is harmless, but activating a broken one can lock you out of the dashboard.
- Use staging if the site is live. A staging site is a private copy of your site. Our roundup of WordPress staging plugins covers free tools that make one in a few clicks.
- Check which WordPress you have. This guide is for self-hosted WordPress. On WordPress.com, theme uploads need a paid plan.
- Pick the theme first. Our WordPress theme reviews compare speed, features and pricing.
You can keep several themes installed, but only one theme, or a child theme with its parent, is active. Keep a default fallback theme and remove unused extras. WordPress.com’s theme library and upload permissions depend on its plan; self-hosted WordPress does not impose that plan restriction.
Method 1: Install a Theme From the WordPress Dashboard
This is the easiest way, and it works for any free theme in the WordPress.org directory, including Astra, Kadence, GeneratePress and OceanWP.
- In your dashboard, go to Appearance > Themes.
- Click Add Theme at the top. (Older guides call it “Add New” or “Add New Theme.” In WordPress 7.1 the button just says “Add Theme.”)
- Type the theme name into Search Themes. You can also browse the Popular, Latest and Block Themes tabs, or use Feature Filter to filter by layout and features.
- Hover over the theme and click Install.
- When the button changes, click Live Preview to try it on your own content, or Activate to switch to it right away.
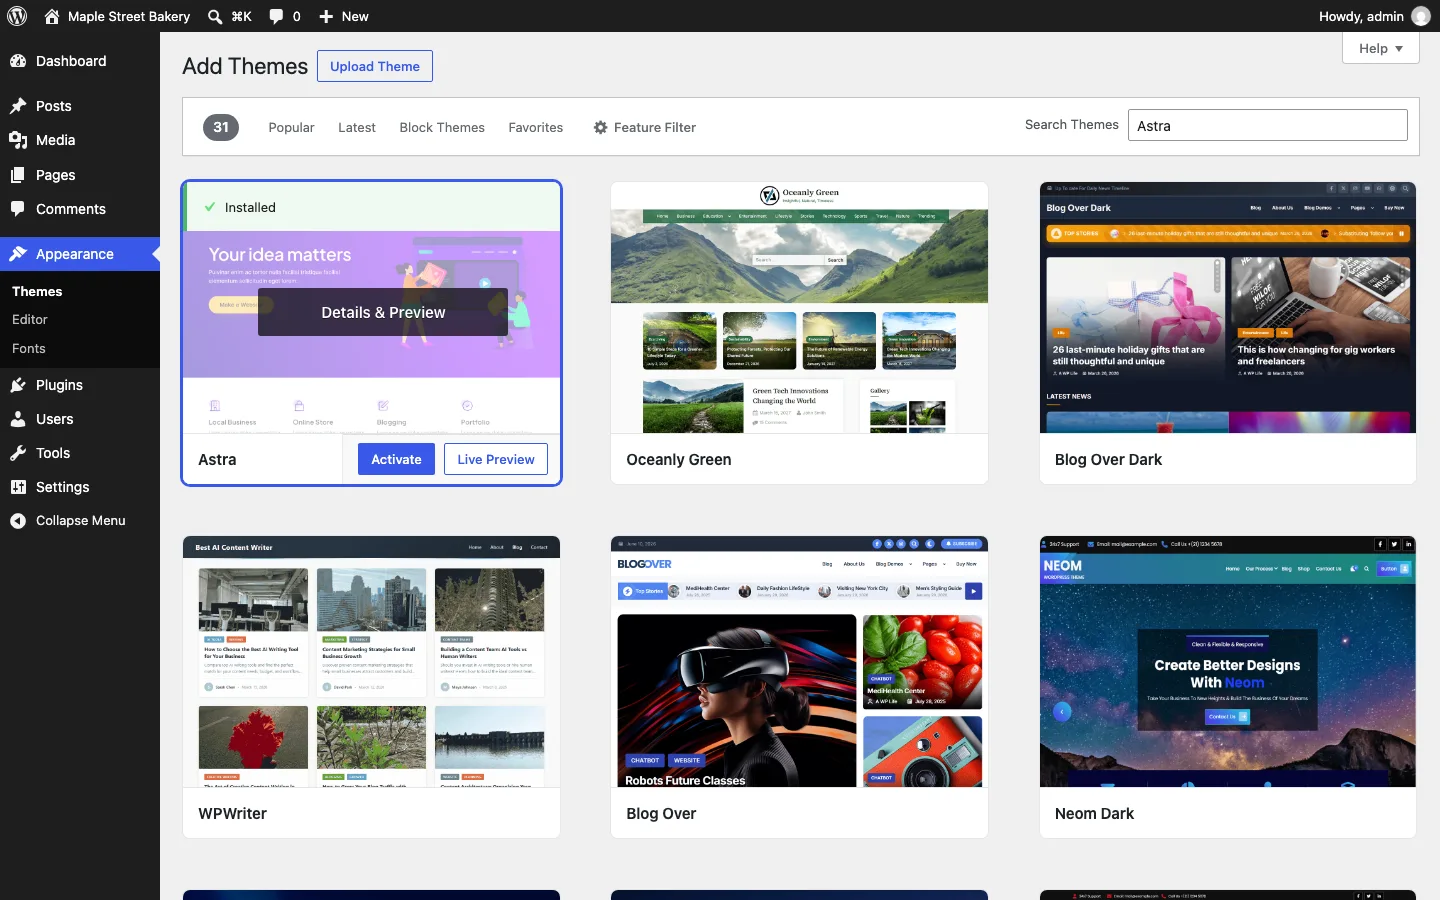
Searching for Astra on the Add Themes screen; after Install, the card offers Activate and Live Preview. WordPress test install.
On our test install, Astra 4.14.0 took about four seconds to download and install. Astra is a classic theme, so Live Preview opened the Customizer with our sample bakery posts in the Astra layout. The button at the top said Activate & Publish. Nothing changes for visitors until you click it.
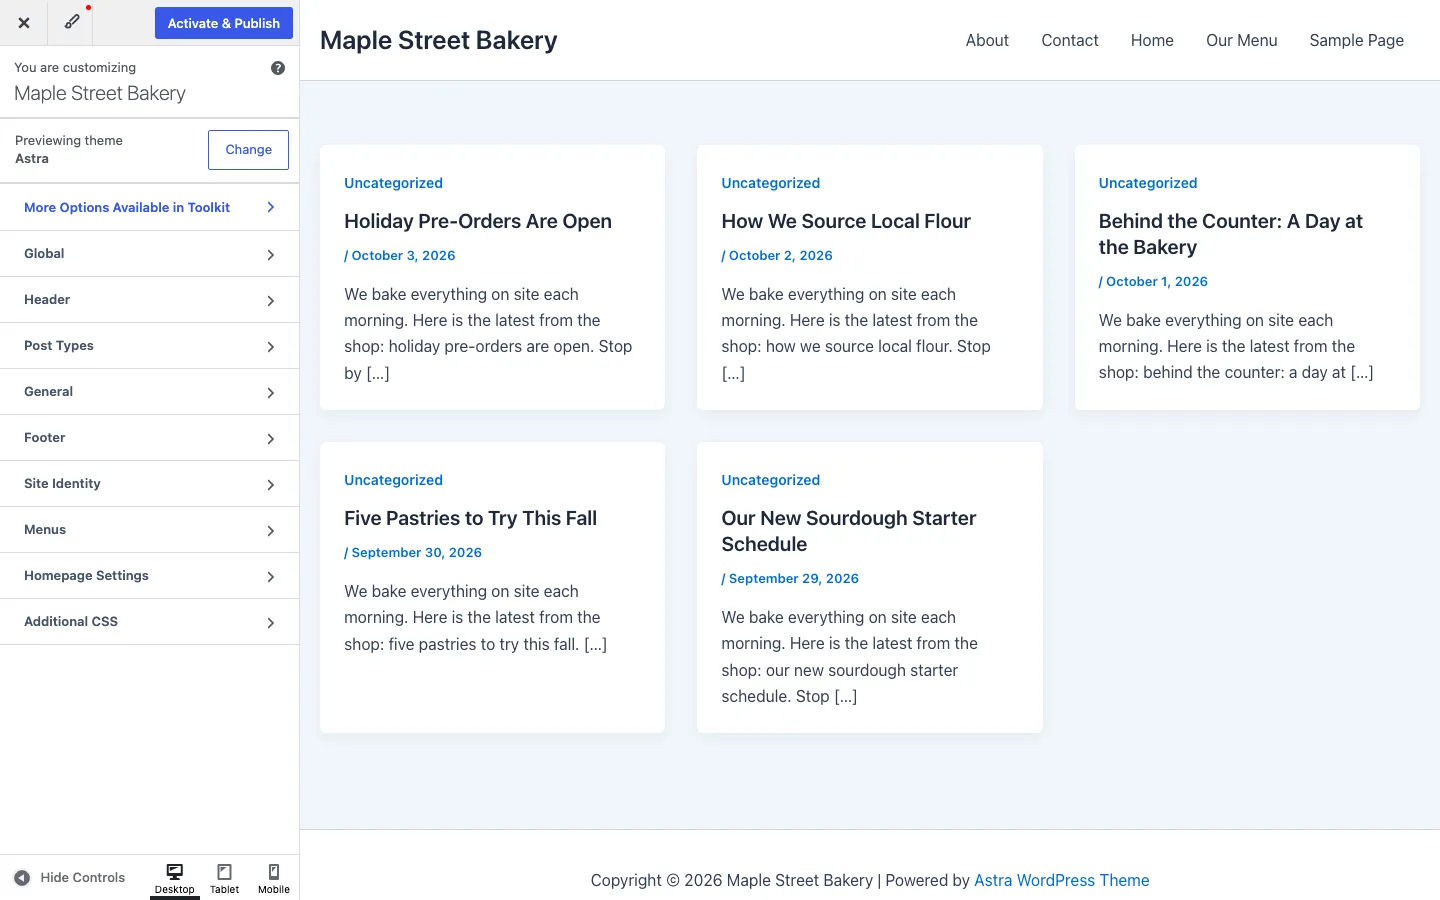
Live Preview of Astra in the Customizer before activation, on a fresh WordPress install with sample posts.
Our Astra review covers what the free theme includes and what Astra Pro adds.
Method 2: Upload a Theme Zip (Premium Themes)
Use this for themes you bought or downloaded somewhere other than WordPress.org: ThemeForest, a theme shop, or a developer.
- Download the theme’s .zip file to your computer. Do not unzip it.
- Go to Appearance > Themes > Add Theme and click Upload Theme.
- Click Choose File, pick the zip, and click Install Now.
- When you see “Theme installed successfully,” click Live Preview or Activate.
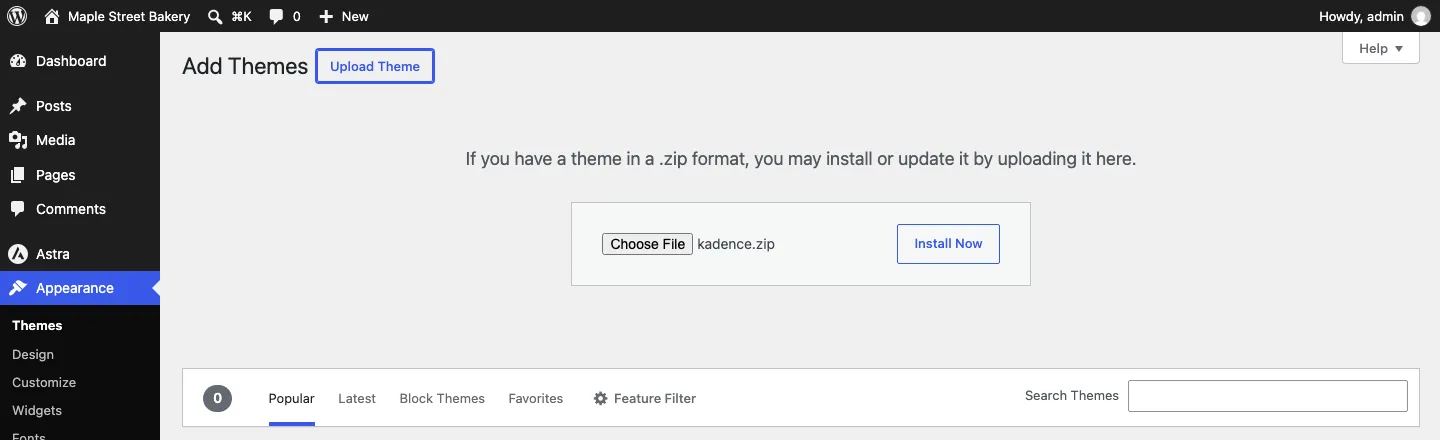
The Upload Theme form on our WordPress test install with the Kadence theme zip selected.
For a stand-in premium theme, we used the free Kadence 1.5.2 zip from WordPress.org (about 2 MB). It uploaded and installed in a couple of seconds.
The ThemeForest mistake: uploading the whole package
ThemeForest offers two downloads: Installable WordPress file only and All files & documentation. The second is a bigger zip with the theme zip inside it, plus documentation, licenses and often demo content. WordPress can’t install it.
To reproduce this, we built a package like that: a folder holding kadence.zip, a Documentation folder, a Licensing folder and a Demo-Content folder, zipped up to about 10 MB. Uploading it gave this error:

Uploading a ThemeForest-style full package instead of the theme zip, on our WordPress test install.
The fix: unzip the package on your computer, find the inner theme zip (here, kadence.zip), and upload that. On our test site, the inner zip installed on the first try.
Premium add-ons cause the same error. GP Premium, Astra Pro, Kadence Theme Kit Pro and the OceanWP Pro extensions are plugins, according to each vendor’s documentation. They go in Plugins > Add Plugin > Upload Plugin, not under Themes.
For updates without a vendor updater, upload the new installable ZIP and review WordPress’s replacement confirmation. Back up first and keep custom changes in a child theme so replacing the parent does not overwrite them.
Method 3: Install a Theme With SFTP or a File Manager
Use this when the upload form fails, the zip is too big for your server, or you can’t get into the dashboard.
- Unzip the theme on your computer. You should get one folder (for example
generatepress) withstyle.cssdirectly inside it. - Connect to your site with an SFTP app such as FileZilla, using the SFTP details from your host. Or open your host’s file manager.
- Go to
wp-content/themes/inside your WordPress folder. - Upload the whole theme folder there.
- Go back to Appearance > Themes. The theme now shows up, ready to activate.
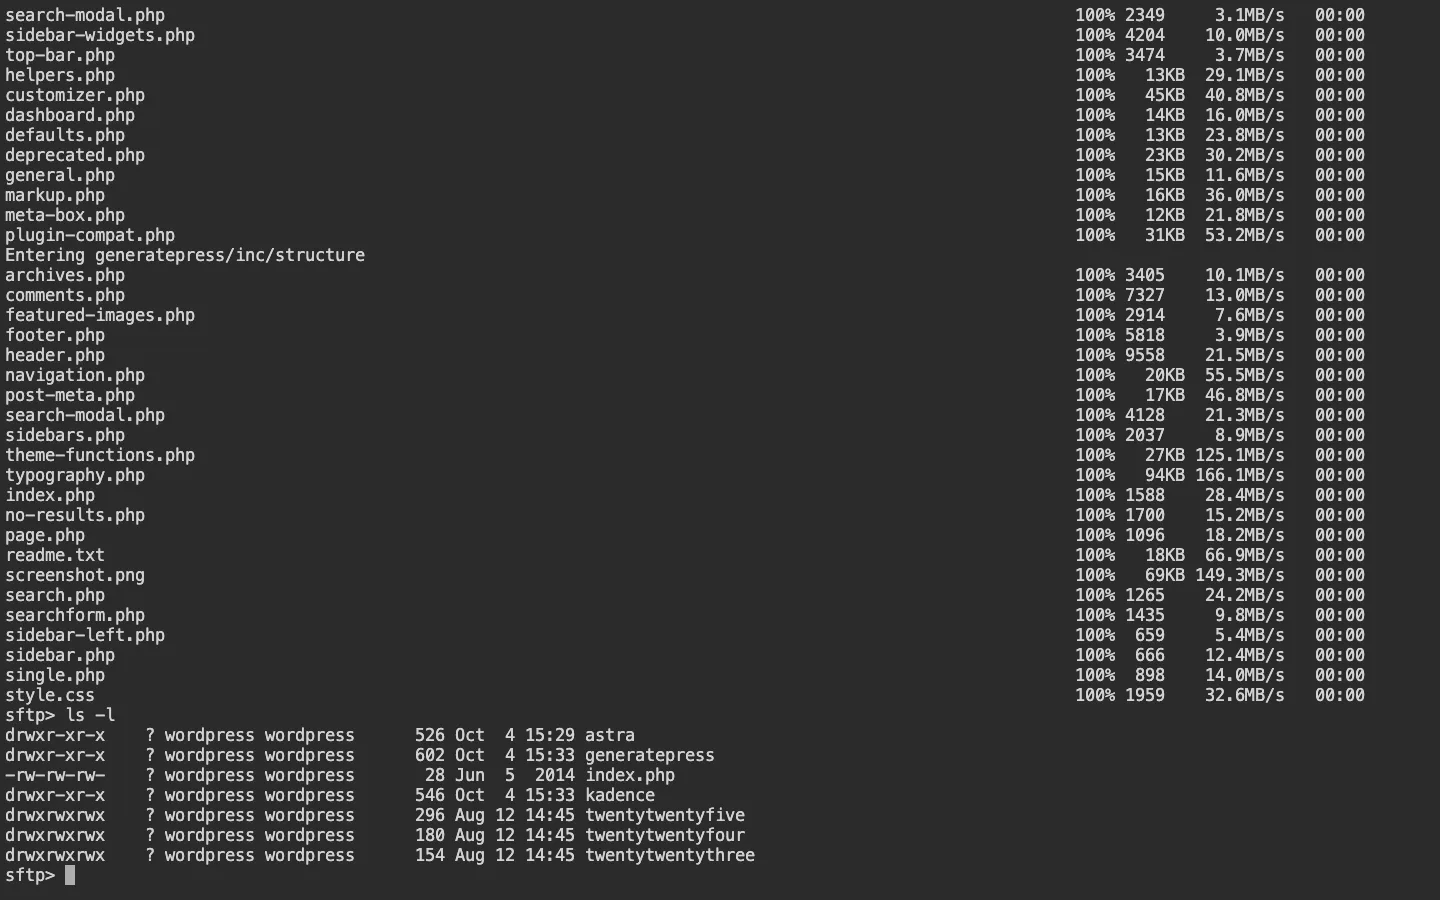
The end of an SFTP upload of GeneratePress into wp-content/themes, followed by a folder listing, on our test server.
On our test server, we uploaded the unzipped GeneratePress 3.6.1 folder with the command-line sftp tool (put -r generatepress), and it appeared on the Themes screen as soon as the upload finished. Hosting file managers such as cPanel’s work the same way, and many can unzip a file on the server for you. The usual mistake here is uploading the zip file itself: WordPress ignores zip files in the themes folder. Our GeneratePress review covers what the theme does once it is active.
Method 4: Install a Theme With WP-CLI
WP-CLI is the official command-line tool for WordPress. Many hosts include it, and you run it over SSH. One command installs a theme from WordPress.org and activates it:
wp theme install oceanwp --activate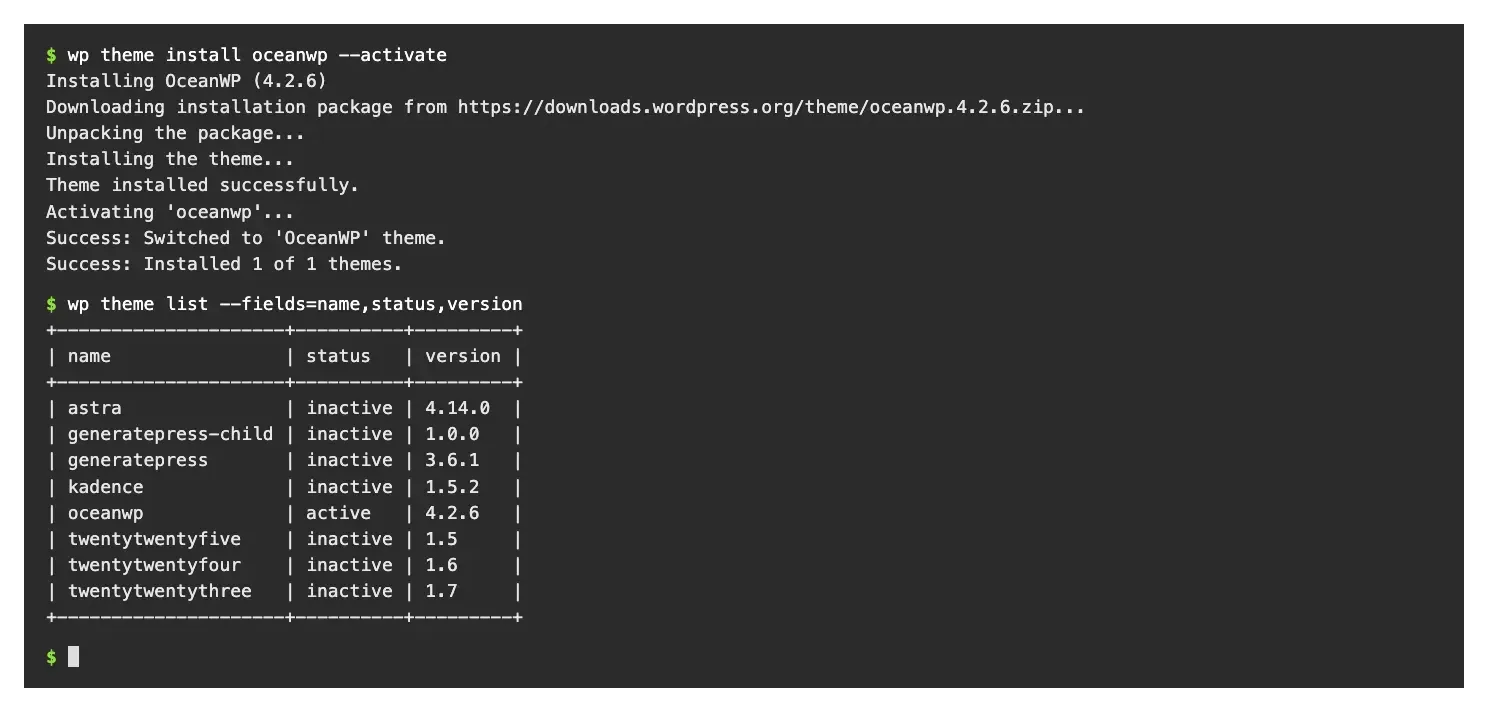
WP-CLI output on our test install: installing and activating OceanWP, then listing installed themes.
On our test install, that took under ten seconds, from download to “Success: Switched to ‘OceanWP’ theme.” A few related commands:
wp theme install /path/to/theme.zip --activateinstalls a premium theme zip that is already on the server.wp theme listshows every installed theme and which one is active.wp theme activate twentytwentyfiveswitches themes.
After activation, OceanWP showed a dashboard notice pointing to its setup wizard. Our OceanWP review covers the wizard and the add-ons.
How to Change Your WordPress Theme Safely
Switching themes doesn’t delete posts, pages, media or users. Those live in the database. What changes is everything the theme controls: layout, menus, widgets and theme settings.
1. Back up, and use staging for a live site
Take a full backup (files and database) first. For a busy site, make the switch on a staging copy, fix what breaks there, then push it live. If you use All-in-One WP Migration for backups, our step-by-step guide to the plugin shows the export and restore steps.
2. Preview before you activate
Classic themes (Astra, Kadence, GeneratePress, OceanWP) preview in the Customizer, as shown in Method 1.
Block themes (such as Twenty Twenty-Five) preview in the Site Editor. The Live Preview button opens your site in the new theme with an Activate button at the bottom left.
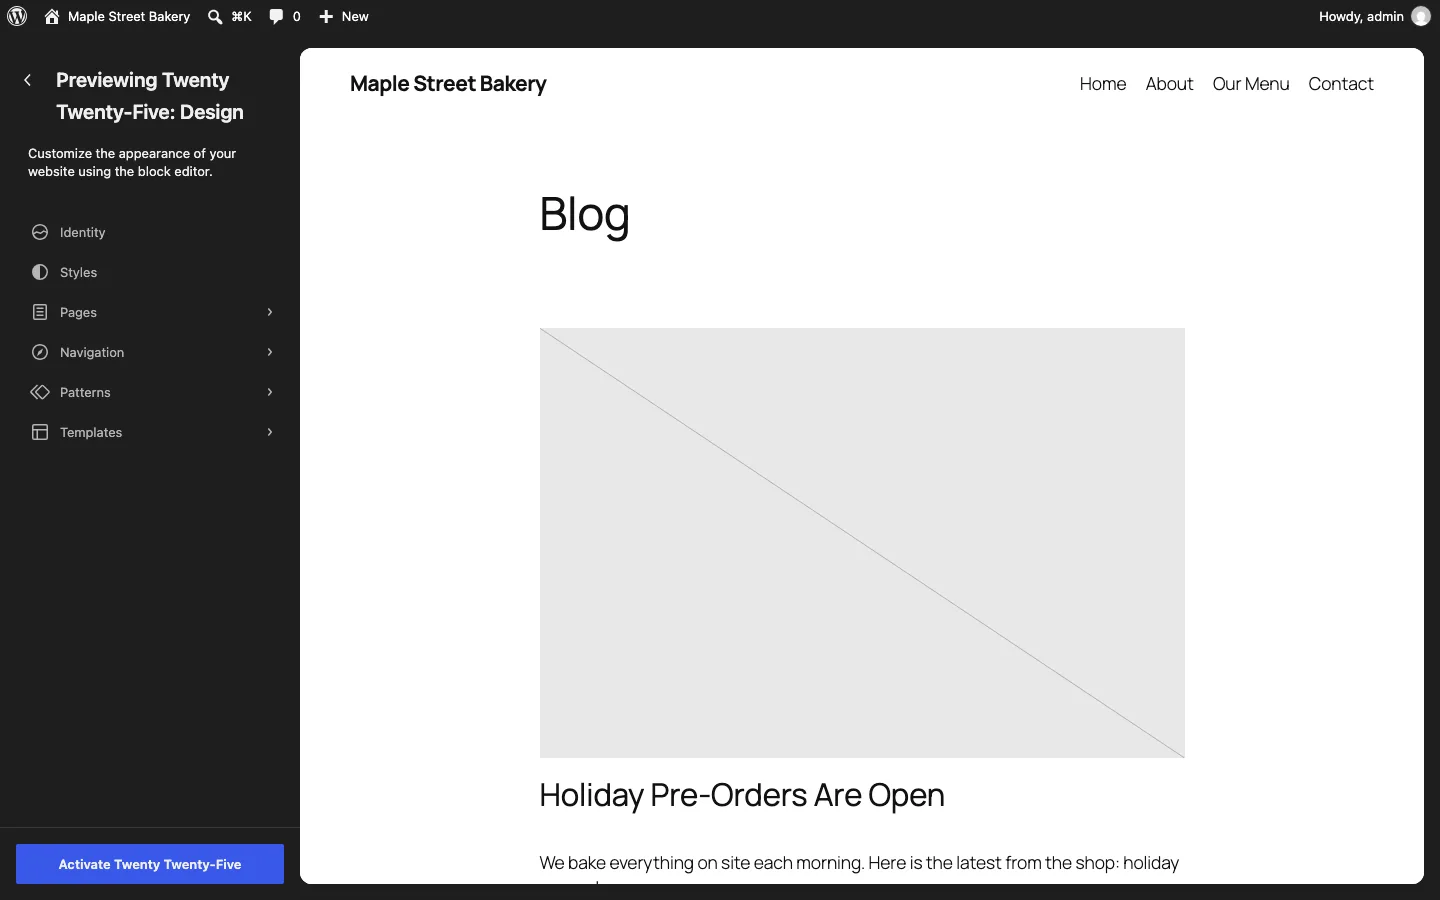
Previewing the Twenty Twenty-Five block theme in the Site Editor on our WordPress test install. The header picked up our classic menu items.
3. Check menus and widgets after switching
On our test site, we set up a “Main Menu” in Astra’s Primary location and two block widgets (opening hours and recent posts) in Astra’s sidebar. Then we switched themes:
- Astra to OceanWP (classic to classic): WordPress moved the menu into OceanWP’s “Main” location and the widgets into OceanWP’s sidebar on its own.
- Classic to block (Twenty Twenty-Five): in the Live Preview, the block theme’s header showed our menu items. After we activated it, the sidebar widgets disappeared from the site, because block themes have no widget areas.
- Back to Kadence: the widgets returned to the sidebar. WordPress had kept their assignments.
WordPress makes a best guess when it maps menus and widgets between themes. After any switch, check Appearance > Menus and Appearance > Widgets (classic themes) or the Site Editor (block themes).
4. Know what happens to Customizer settings
Customizer settings belong to each theme. On our test install, the Additional CSS we added in Astra did not carry over to OceanWP. It was still stored under Astra in the database, with Astra’s other Customizer settings, ready to return if we switched back. So copy any Additional CSS you want to keep, and expect to set your logo, colors and fonts again. Shortcodes and features that came with the old theme (sliders, portfolios, bundled builder modules) may stop working, which is the main reason to test on staging.
5. Block themes vs classic themes
A classic theme uses the Customizer, the Menus screen and widget areas. A block theme uses the Site Editor for everything: headers, footers, templates, styles and navigation. On our test install, the Appearance menu showed Customize, Widgets and Menus with a classic theme active, and Editor and Fonts with Twenty Twenty-Five. Switching between the two types is where most cleanup work happens.
6. Use a child theme for code edits
If you plan to edit theme files or add PHP to functions.php, do it in a child theme. A child theme is a small theme that inherits everything from its parent. Your changes stay in the child, so parent theme updates don’t wipe them out.
A minimal child theme is one folder with a style.css that names the parent:
/*
Theme Name: GeneratePress Child
Template:   generatepress
*/
Add a functions.php for code. Upload the folder to wp-content/themes/, then activate the child theme. The parent theme stays installed. On our test install, wp theme list showed GeneratePress with the status “parent.” Our Kadence review covers how far you can get without code at all.
Common Theme Installation Errors and How to Fix Them
“The theme is missing the style.css stylesheet”
What it means: WordPress unzipped your file and found no style.css where it expected one (see the ThemeForest example in Method 2). How to fix it:
- Unzip the download on your computer and look inside. If you see another zip plus folders like “Documentation,” upload that inner zip.
- If you uploaded a plugin zip (such as GP Premium or Astra Pro) under Themes, install it under Plugins instead.
- If the zip has an extra folder level, re-zip it so
style.csssits one level down.
“The link you followed has expired”
What it means: your zip is larger than the server allows. When a file is bigger than PHP’s post_max_size, PHP throws the upload away before WordPress can check it. WordPress then shows this vague message.
Our test server used the PHP defaults: 2 MB for upload_max_filesize and 8 MB for post_max_size. The 10 MB package gave “The link you followed has expired.” A 4 MB test zip gave a clearer message: “The uploaded file exceeds the upload_max_filesize directive in php.ini.”

Uploading a 10 MB zip to our test server with PHP’s default 8 MB post_max_size.
How to fix it:
- Check your limit. Go to Tools > Site Health > Info > Media Handling and look at “Max size of an uploaded file” and “Max size of post data allowed.”
- Skip the limit. Install the theme with SFTP (Method 3) or WP-CLI (Method 4). Neither uses the browser upload, so the limit doesn’t apply.
- Raise the limit. Your server setup decides how:
- Apache with PHP as a module (our test server): add these lines to the
.htaccessfile in your WordPress folder:
On other server setups these lines can cause a 500 error. If that happens, remove them.php_value upload_max_filesize 64M php_value post_max_size 64M php_value max_execution_time 300 - Other setups, such as PHP-FPM: put the same settings (as
upload_max_filesize = 64Mand so on) in aphp.inior.user.inifile, or change them in your hosting panel’s PHP settings. - Managed hosting: ask support. Many hosts raise the limit on request.
- Apache with PHP as a module (our test server): add these lines to the
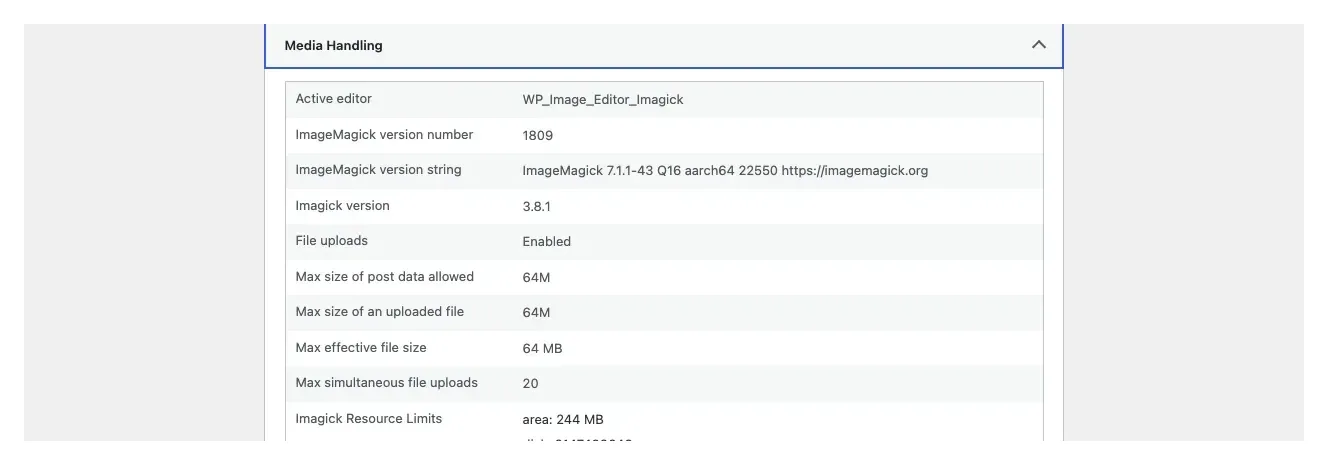
Site Health on our test install after adding php_value lines to .htaccess; both limits went from 2M and 8M to 64M.
After the .htaccess change, Site Health showed 64M for both limits, and the same 10 MB package uploaded and went through to WordPress. (It then hit the style.css error, because it was the full package.)
What doesn’t work: many tutorials say to add @ini_set( 'upload_max_filesize', '64M' ); to wp-config.php. We added both ini_set lines to wp-config.php on our test install. The limits stayed at 2M and 8M, and the 4 MB upload still failed. PHP only accepts these two settings from server-level config, not from code. wp-config.php is still useful for related limits like WP_MEMORY_LIMIT and for turning on debugging; our guide to editing wp-config.php safely shows how.
White screen or “There has been a critical error” after activation
What it means: the new theme (or your edit to it) has a PHP error, so WordPress can’t load. Older WordPress versions showed a blank white page, the “white screen of death.” Current versions show a short message instead.
To reproduce it, we made a GeneratePress child theme with one missing semicolon in functions.php and clicked Activate. The dashboard itself broke:

The screen right after activating a child theme with a typo in functions.php, WordPress test install with debugging off.
The front end showed the same message with a 500 error code. WordPress also tries to email the site admin a recovery mode link that lets you log in with the broken theme paused. If that email arrives, use it. If it doesn’t, use one of these fixes.
Fix 1: Rename the theme folder. Connect with SFTP or your host’s file manager, open wp-content/themes/, and rename the broken theme’s folder (we added -off to the end).
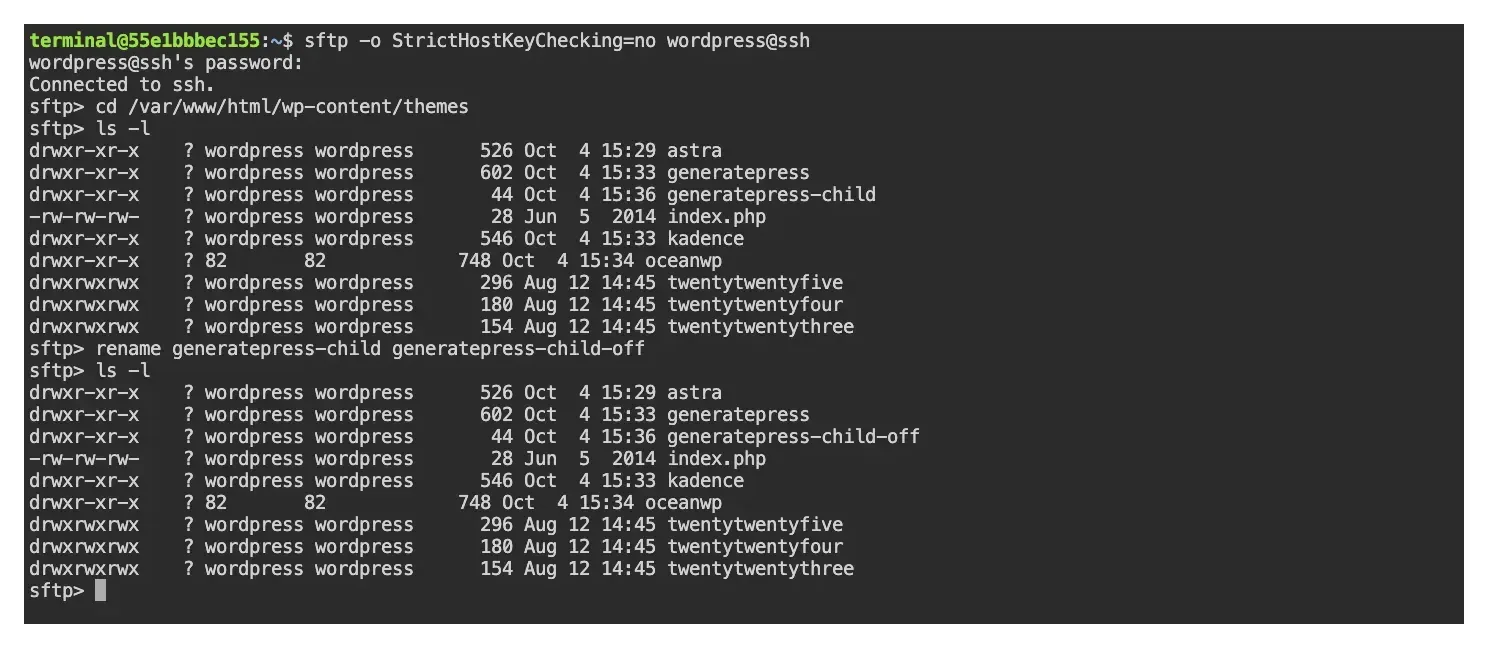
Renaming the broken child theme’s folder over SFTP on our test server.
The site loaded again right away. On the next dashboard visit, WordPress said “The active theme is broken. Reverting to the default theme.” and switched to Twenty Twenty-Five. This only works if a default theme is still installed, so keep one around, even if you delete other unused themes.
Fix 2: Switch themes with WP-CLI. WP-CLI loads your theme too, so a plain wp theme activate fails with the same error. Add --skip-themes and it works:
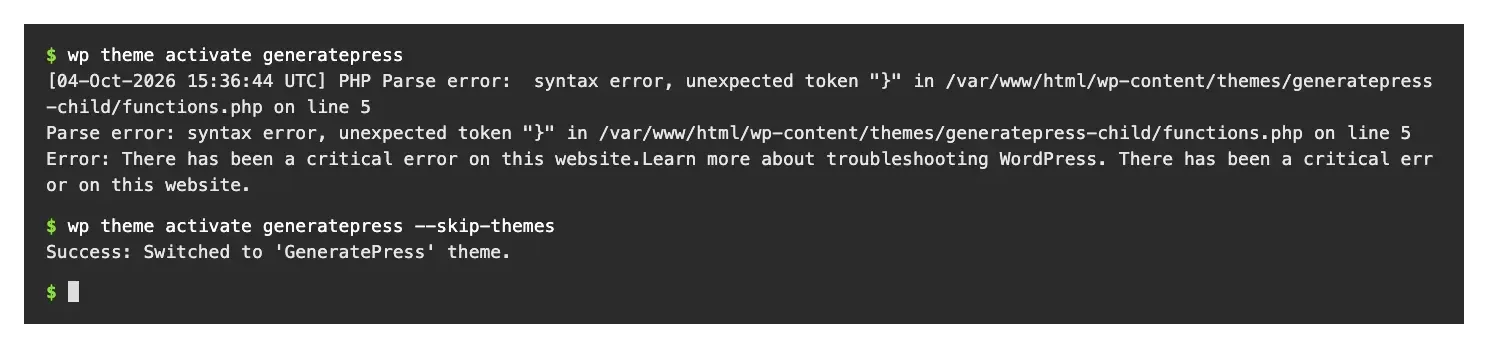
WP-CLI on our test install: without –skip-themes the command hits the theme’s parse error; with it, the switch succeeds.
Find the cause. Turn on debugging in wp-config.php (define( 'WP_DEBUG', true );) on a staging copy and reload the page. On our test install, the page then showed a parse error with the exact file and line: functions.php on line 5. We added the missing semicolon, renamed the folder back, and the child theme activated without a problem.
Other problems after installing a theme
- The site doesn’t look like the theme demo. Demos use sample content and settings. Most popular themes include a starter template or demo import tool. You may also need to set a static homepage under Settings > Reading.
- Pages show 404 errors after switching. Go to Settings > Permalinks and click Save Changes to rebuild the rewrite rules.
- Changes don’t show up. Clear your caching plugin, your host’s cache and your browser cache.